
WebPower Part Image Management User Manual

Introduction
The purpose of this document is to provide step by step procedures to resize / rename and upload part images to be displayed on a WebPower web-site.
Contents of this Document
SECTION 1 – Getting Ready
It should be noted that Procedures 1 – 3 are one time procedures that will install and/or prepare the image management tools necessary to convert, resize, rename and upload images for your web site. You should read, understand and perform these procedures first before you attempt to upload any images.
Procedure 4 is designed to help you understand the recommended naming conventions for part images. Following the suggested standard naming convention will help you organize, track and understand images that you use on your web-site. We have also programmed WebPower to use this naming convention in a way the will minimize your image management work effort.
SECTION 2 – Image Management
Procedures 5 – 6 are procedures that will be repeated based on the number of times new images are uploaded. It is important that you organize and maintain your images on your local PC in a fashion that will make it easy for you to find images that have been uploaded.
SECTION 3 – Image FTP Upload
Procedure 7 will impact the image file folder for your web site, it is critical that you understand this procedure in detail.
Appendix – Screen Shots
Screen shots are provided for Procedures 6 to help you visualize the steps in these procedures. Procedure 7 has the screen shots imbedded in the procedure.
SECTION 1 – Getting Ready
Procedure 1 - Installation – FastStone Photo Resizer
WebPower requires images to be in a specific size and format to be properly presented on the web. To accomplish this easily you will need an image converter / resizer program on your local PC to enable you to convert, rename and resize images in a quick and easy batch mode. The following steps will install FastStone Photo Resizer, an inexpensive program that you can use for your web site image management.
Difficulty: Easy
Time Required: Minutes – One time installation process.
Related Screen Shots: See Appendix – Procedure 1
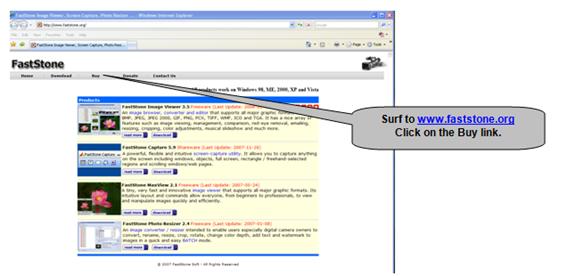
On the PC you will use for your web site image management log to http://www.faststone.org.
You will be using the FastStone Photo Resizer for commercial use so Click on the Buy button on the top navigation bar.
Purchase and download the FastStone Photo Resizer (latest version - it is the bottom product on the buy page). Cost is $19.95 for a lifetime license that includes all future upgrades.
When the download is completed install FastStone Photo Resizer.
Tips:
You many want to install a shortcut to this program on your Desktop if you will be dealing with a large number of images for your web-site
A reboot of your computer is not required.
Images can consume large amounts of hard disk space so make sure the PC used for your image management has adequate space.
What You Need: XP, Vista or Later Versions of Windows OS
Procedure 2 – Setup – FastStone Photo Resizer
WebPower expects a minimum of two images in the web server image directory for web display - a large image and a small (thumbnail image). You will be creating both large and small (thumbnail) images for each original image that you have. The following steps will allow you to set-up and save the necessary resizing/renaming files for the large and small (thumbnail) images used by your WebPower web site.
Difficulty: Easy
Time Required: Minutes – One time set-up process for each image size.
Related Screen Shots: See Appendix – Procedure 2
Image File(s) Configuration:
Start FastStone Photo Resizer Program.
On the Batch Convert Tap check the box - Use advanced options.
Click on the Advanced Options button.
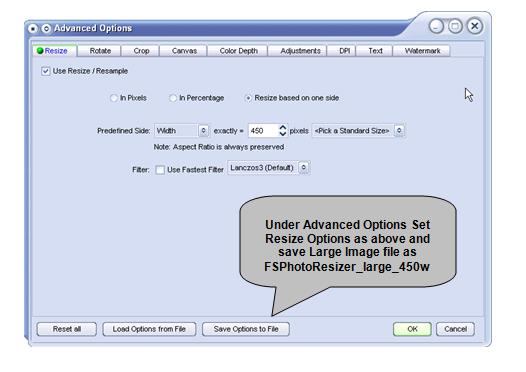
Under Advanced Options click on the Resize Tap
Check the box – Use Resize / Resample
Select the radio button – Resized based on one side
Set the Predefined Side box to Width exactly = 450 pixels and leave the last box at <Pick a Standard Size>.
Set the Filter to un-checked and leave the last box as Lanczos3 (Default).
Since this is your first time setting up the large image setting – Click the Save Options to File button at the bottom. You can now save all of these setting for future use. Recommend you call the Converter Configuration File ( FSPhotoResizer_large_450w )
Click the OK button
You will now be returned to the opening screen for FastStone Photo Resizer.
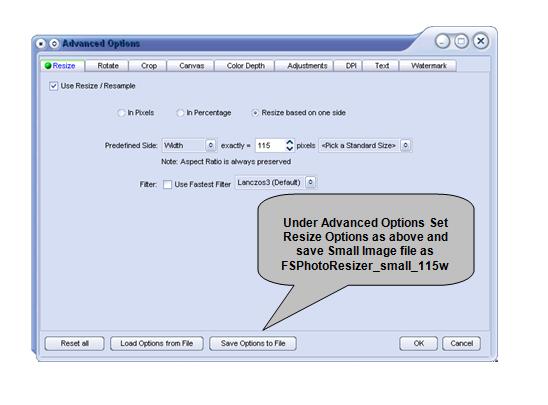
Repeat steps 4 – 11 only in Step 7 change the Width exactly = 115 pixels and in Step 9 save this file as ( FSPhotoResizer_small_115w ).
Tips:
You will be using these two configuration files for all of your images conversions in the future. The first time that you convert images only do one or two images to test the results on your web site before you use these saved files for bulk image conversions.
These configuration files depend on your original images being approximate square in height and width. Target your original images to be approximately 500 pixels x 500 pixels and of high resolution for best results. (See Procedure 4 for More Detail)
Procedure 3 – Establish Your Image Folders
FTP or File Transfer Protocol is used to transfer data from one computer to another over the Internet, or through a network. You will be transferring the resized / renamed images from your local PC to the web server using FTP Client FileZilla (See Procedure 7). It is critical you organize folders on your PC to hold both the Original Images and Resized Images to be transferred to the web server when you FTP the images to your web site image directory.
Establish a folder named ORIGINAL IMAGES on your PC
You will want to establish sub-folders by vendor and date to help with your organization. Your original images should be approximate square in height and width and be approximately 500 pixels x 500 Pixels.
Establish a folder named RESIZED IMAGES on your PC
You will want to establish sub-folders by vendor and date uploaded. This will help you if you need to replace images already uploaded to the site.
Establish a folder Named UPLOAD IMAGES on your PC
You will want to move images you have resized and uploaded from your RESIZED IMAGES folder into this folder. This will help organize your efforts and prevent you from re-uploading the same images over and over again.
Keep in mind you will be potentially managing thousands of part images over time.
Difficulty: Easy
Time Required: Minutes – one time configuration of folders and subfolders
Procedure 4 – Establish Naming Convention for Images
WebPower can display up to 6 part images of the same part on the Product Page of the site. If you use the following naming convention for the part images you will not need to list the image names in the AutoPower-WebPower Part Number file Maintenance area. All other naming conventions will require that you provide the image names in this AutoPower / WebPower maintenance area.
Difficulty: Easy
Time Required: Seconds – one time decision
Standard Single Image Naming Convention
The standard image naming convention is simple. Use the part number including the Manufacture code less any special characters. For example if you have a part number like: HDM 20-400-ES
The image name would be: HDM20400ES
Simply remove any "/" or "-" or spaces.
Multiple Image Naming Convention
Multiple Images follow the same rule as single images only at the end of the part number you would place an underscore and some type of differentiator. For example if we want five images for the above part to be displayed we could provide five images named:
HDM20400ES_1 HDM20400ES_2 HDM20400ES_3 HDM20400ES_4 HDM20400ES_5 |
Tips:
The first image name found will always be used for image display in the specials areas if this part is identified as a special.
Using other naming conventions will be more labor intensive and not as efficient for web site image management.
SECTION 2 – Image Management
Procedure 5 – Gathering Original Images
Original Images
The original images collected to be resized / renamed for web use should be approximately square in height and width dimensions. 500 pixels x 500 pixels is a good target. These images should be higher resolution images. If you start with images that are not square and/or are of poor resolution do not expect good results on your web site.
Difficulty: Will vary based on your access to part pictures.
Time Required: Will vary based on your access to part pictures and the quantity of parts that you wish to display with images.
Establish an original image folder(s) on your PC.
As you gather images place them in this folder making sure the image names match your selected naming convention.
Make sure images are approximately square in height and width dimensions with a target of 500 pixels x 500 pixels.
Gather the highest resolutions images that you can find or make.
Tips:
Stating with high resolution images will yield better quality image presentations on your web-site.
It is recommended that you use a white background color for images.
FastStone Photo Resizer can also help you with batch renaming of original images.
Manufacturers may offer image CD's of their parts.
There is a program called SnagIt by TechSmith that you may want become familiar with. It can easily capture and format pictures. http://www.techsmith.com/snagit.html
Start with part images that you intend to use as specials other can be added over time.
Procedure 6 – Converting Original Images
Now you are ready to use FastStone Photo Resizer to optimize your images for the web and create both the large and small image.
Difficulty: Easy
Time Required: Minuteswill vary based on the number of original images to be converted.
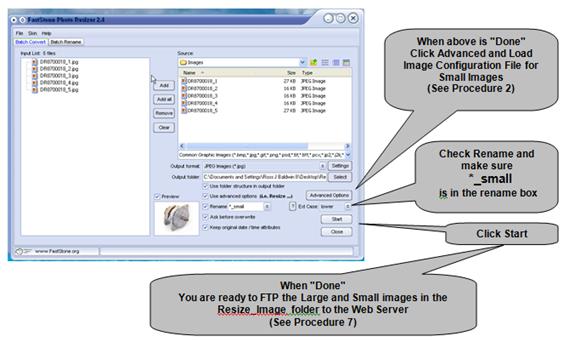
Related Screen Shots: See Appendix – Procedure 6
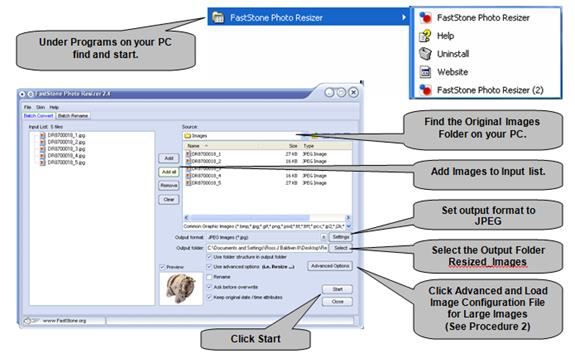
Start FastStone Photo Resizer program and make sure you are on the Batch Convert tap. Use the Source: in the window on the upper right hand side to locate your original image folder.
Use the Add, Add All, Remove, Clear center buttons to add images to the Input List: on the left side.
Output format: should be JPEG Images (*.jpg).
Output folder: should be a different folder than the folder containing the original images in this case we will call it Resized_Images. Use the Select button to find or create this folder on your PC.
Check the box – Use folder structure in the output folder
Check the box - Use advanced options.
Click on the Advanced Options button.
Under Advanced Options click on the Resize Tap. (Note: If you have not done Procedure 2 stop and do it before you proceed.)
Load Options from File button at the bottom. Load the large conversion file ( FSPhotoResizer_large_450w )
Click the OK button
You will now be returned to the original screen.
Leave the Rename box un-checked
Optional but recommended Check the Ask before overwrite box.
Optional but recommended Check the Keep the original Date/Time Attributes box.
Press the Start button to start the conversion.
When conversion is done Click the Done button and all large images are now ready in your Resized_Images folder to upload to the web server. You will now prepare the small (thumbnail) images for upload.
Repeat Step 7 and 8.
Click the Load Options from File button at the bottom. Load the small conversion file (FSPhotoResizer_small_115w)
Click the OK button
You will now be returned to the original screen.
Check the Rename: box. In the Rename Box type *_small in lower case.
Press the Start button to start the conversion.
When conversion is done Click the Done button and all small images are now ready in you Resized_Images folder to upload to the web server.
SECTION 3 – Image FTP Upload
Procedure 7 – Uploading Images to Web Server use FileZilla
Important: The following steps are an example using our WebPowerDemo.com web-site. You will need to substitute the url for your web site wherever you see webpowerdemo.com or the specific IP address of your site.
AutoPower does not support FireZilla but we have successfully used this product to transfer images. FileZilla is fast and is recommended if you are transferring a large number of images.
Download and install FileZilla Client. http://filezilla-project.org/ Filezilla Client is a free FTP Solution
Install and Start FileZilla Client
Under the File Tap select "Site Manager"
Click "New Site" on the left to add your site and add your site as the new site.
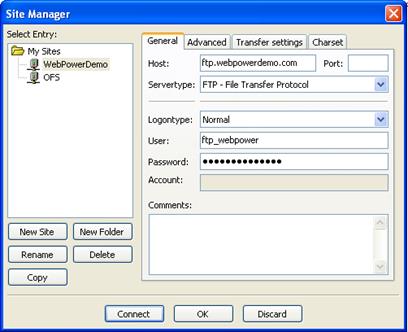
On the "General" Tap in the panel on the right you should provide the following:
¨ Host: ftp.{your_url}.com or the best practice is to use your website IP address provided to you from AutoPower.
¨ Port: {blank}
¨ Servertype: FTP – File Transfer Protocol
¨ User: {User name provided to you from AutoPower}
¨ Password: {Password provided to you from AutoPower}
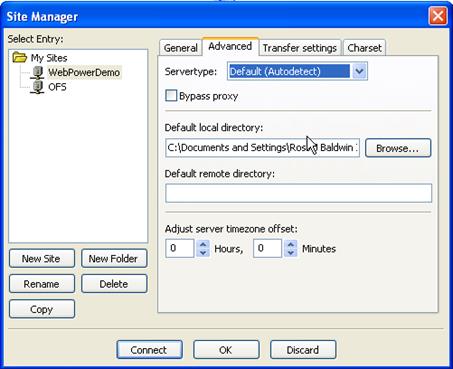
On the "Advanced" Tap
¨ Leave Servertype: Default (Autodetect)
¨ If you consistently place the resized photos in a specific Directory "Browse" to that Directory
¨ Other setting can be left blank
On the "Transfer Settings" Tap Make Transfer mode: Active
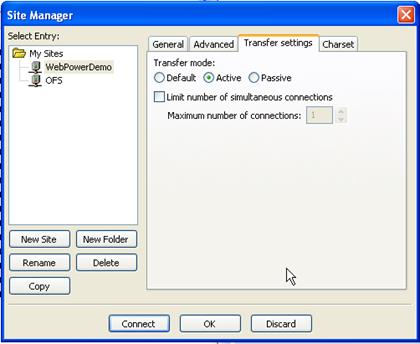
On the "Charset" Tap make no changes
You should now be able to click the "Connect" button and connect to the server directory where your images are stored.
Depending on the size of your image folder this may take a minute or so to display the folder.
If you get a connection error review all setting and confirm that you have entered the PW correctly. {It is case sensitive}
Tips:
Appendix Procedure 6

![]() © 2013 AutoPower Corporation
- All Rights Reserved
© 2013 AutoPower Corporation
- All Rights Reserved